A GIF file features animated images and texts that are much like a video but much shorter in length and often funny. It is trendy among the youths as well as old-timers on the Internet.
One of the most used social media platforms for these types of files is Twitter. Today, we will see how you can create a GIF using various online methods and tools like the Wondershare UniConverter. You will also get to know how to upload a GIF on Twitter. So, by the end, you’ll have a clear idea of how to create and post a GIF on Twitter.
Part 1. Create a GIF for Twitter Using UniConverter in Windows and Mac
The Wondershare UniConverter is an excellent tool for all your tasks relating to photos, videos, and audio files. It is more than your average video/image converter and downloader.
- · An all-in-one tool with tons of features other than simple conversion and downloading.
- · Intuitive interface design makes it very easy to use.
- · It is compatible with Windows and Mac.
- · Using UniConverter Toolbox function, includes convert images, create GIF, burn CD, rip CD, cast to TV, and fix Meta tags with just a few clicks.
- · Wondershare UniConverter allows you to burn video and other media files to DVD as well.
How to Make a GIF in Wondershare UniConverter?---Creating a GIF in Windows using UniConverter
As I mentioned earlier, the UniConverter is compatible with both Windows and Mac OS. It means you can make a GIF on both platforms. You can create a GIF from either a photo or a video.
Step 1. Launch the UniConverter Tool
Download, install, and launch the Wondershare UniConverter app in your Windows PC and switch to the Toolbox tab and select the GIF Maker tool. The tool interface opens.
Step 2. Add the Media
As the window opens, you will see two methods to create a GIF; one from photos and another from videos. The window opens in the Photos to GIF window by default.
To add media files, click on the Add Files options to the top-left corner and select the files from which you want to make GIF. If you are going to use videos switch to the Video to GIF window.
Step 3. Set GIF Preferences
Once you have selected your media files, you have to set a few choices for creating your GIF-like frame rate, file location, and output file size.
In a video file, you will also need to specify the start and end time of the GIF you want to create. You can either drag the video frame as you need or enter the time directly.
Step 4. Finish Creating the GIF
Once you customize the GIF preferences, click on the Create GIF button, and the UniConverter will do the rest.
Your GIF is now ready, and you can share with friends and enjoy!
Creating a GIF in Mac using UniConverter
The whole process is the same, with a few minor differences. Let’s see.
Step 1. Launch the UniConverter Application in Mac
You can download it from the software’s website. Then launch the UniConverter and switch to the Toolbox Tab and select GIF Maker option.
Step 2. Add Media Files
Once again, the same interface appears as before. However, the default screen, in this case, is Video to GIF. Add the video or photos from the Add option. In case of a video file, select the start and end time for your GIF.
In case you want to make a GIF from photos, switch to the Photos to GIF screen and add the images (up to a max of 20 images) from the Add option.
Step 3. Create the GIF
Once you select your photos and specify your video start and end time, all you need to do is click on the Create GIF option and the toll will do the rest while showing you a progress bar.
Once the bar fills up, your GIF is done and ready for sharing.
Part 2. Make an Animated GIF for Twitter Online
You can also upload GIFs to Twitter after creating it online. You can use many third-party online tools to get the job done. Here we will take three examples and see how you can use these online tools to create an animated GIF for Twitter online.
Makeagif
With Makeagif, you can make a GIF from many different sources, unlike other tools, namely photos, videos, YouTube and Facebook URL, and Webcam videos. Moreover, this tool is free to use. For this tool, we will look at how you can use a YouTube video to create a GIF:
Step 1. On your web browser, open YouTube, select & play the video you want to create a GIF from and copy the URL.
Step 2. Now open Makeagif log in with your credentials and select the YouTube to GIF option, and a new window opens with a space to paste the copied YouTube video URL; paste it there and click on Continue to Edit.
Step 3. Next, you need to set a few editing options like the GIF quality, start time & GIF length. You can also add stickers & captions and add a personalized watermark. Now click on the Continue to Publishing.
Step 4. Customized file name, GIF category, and tag and finally click on Create GIF, and the tool will start processing the GIF.
GIFMaker
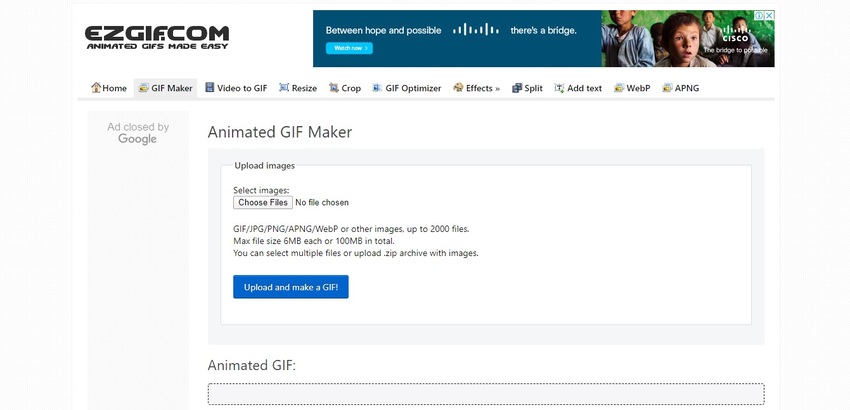
It is another widely used online free tool for creating a GIF, making slideshows and videos with music tracks. You can do some cool stuff like reversing a GIF or resize it. You can also merge two GIFs to make a new one and vice-versa. You can use both photos and videos to create GIFs. You can add up to 300 pictures while up to 100MB per video file.
Step 1. Open GIFMaker on your web browser to start creating your GIF. You can select Upload Images if you want to create a GIF from images, or select Video to GIF in case you want to use a video.
Step 2. If you are using images after you add them, set preferences like canvas size (in pixels) and animation speed. You can also add the number of loops and audio file URL online if you want and click on the Create GIF Animation.
Step 3. In case you are using videos, a new window opens once you click the option. Here you need to upload the video in question and specify preferences like start & end time and GIF height & width and frames per second. Finally, click on the Convert Now option and wait till the GIF creates.
EZGIF
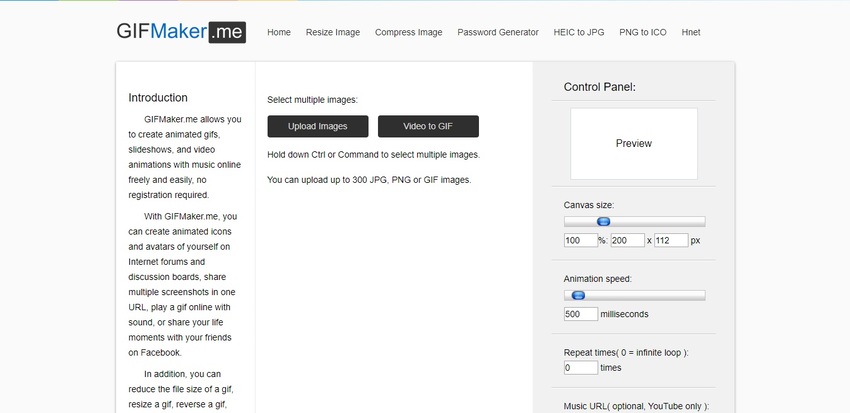
Like the other two, EZGIF is also free to use. You can create a GIF from both photos and videos and use up to 2000 image files while you can use up to 100 MB worth of video files. Moreover, you can do all sorts of things like resizing GIF file size, crop videos, and more.
Step 1. On your web browser, open the website from the URL provided above. In case you want to use photos, switch to the GIF Maker tab. For using videos, switch to the Video to GIF tab. Add the media files by clicking on the Choose File option. You can also use video URL for online videos.
Step 2. Once you have selected the media files (images) simply click on Upload and make a GIF.
Step 3. In case of a video either choose a file from your library or paste the URL of a video from online sources and click on the Upload option.
Step 4. Wait for a few minutes while the GIF produces or converts.

Part 3. How to Upload a GIF to Twitter in 3 Ways?
Now that you know how to create a GIF, you may also want to know how to post a GIF on Twitter, right? Well, we will now take a look at the three best methods to add GIF to Twitter.
Method 1: Upload a GIF to Twitter Directly on Desktop
Before we move on to the step-by-step guidelines, there is one thing that you need to consider. Make sure you are in your Twitter account, that too from the device you are using to share the GIF. Otherwise, you will need to authorize your user account through a pop-up.
Method 1: Upload a GIF to Twitter Directly on Desktop
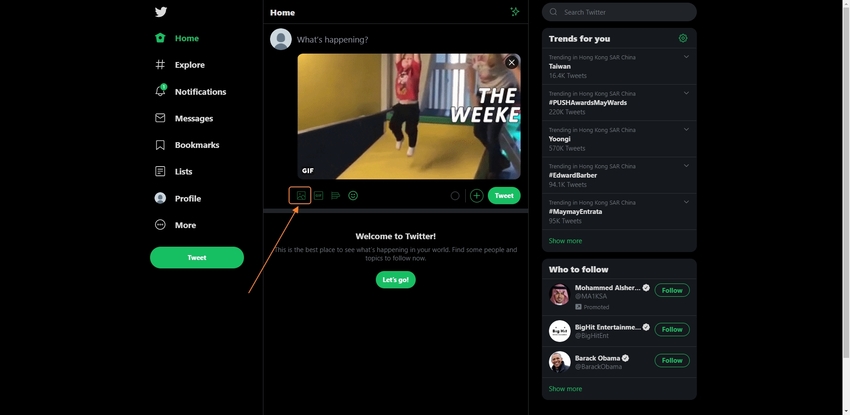
Step 1. Log in your Twitter account, and select the Upload Image icon as screenshot shows.
Step 2. Select a GIF from your computer directly, which is you saved before.
Step 3. After uploading, click the Tweet. Here you go! You are successfully posting a GIF on Twitter.
Method 2: Share GIF to Twitter using Twitter GIF Feature
Step 1. Log in to your Twitter account with your credentials.
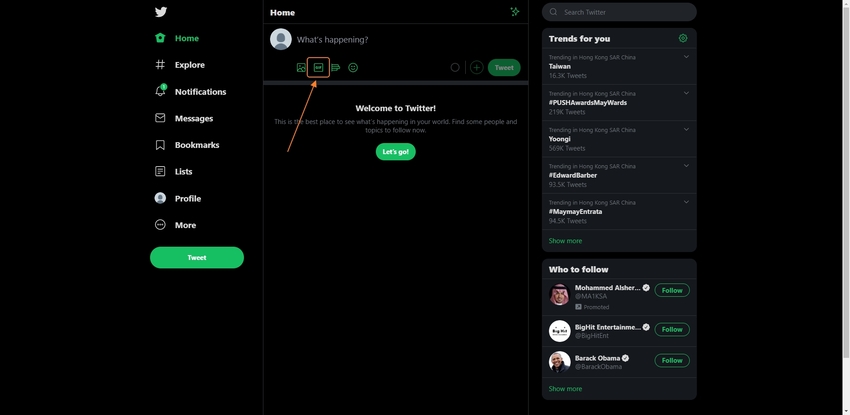
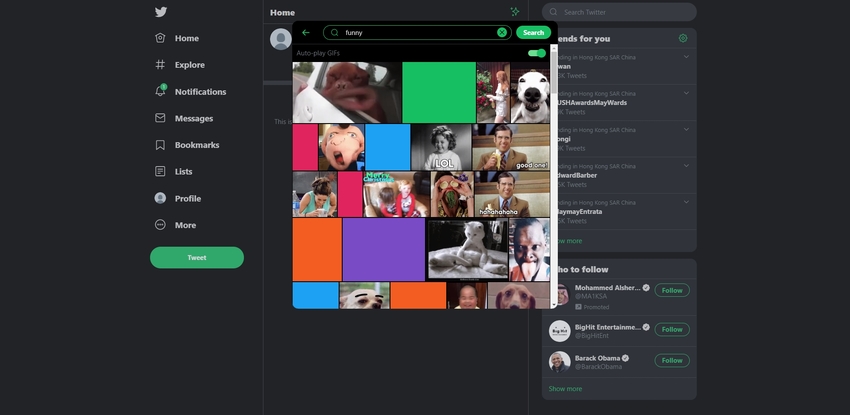
Step 2. Enter to Compose New Tweet and tap on the GIF option below. You can import the GIF from your PC or you can get it online.
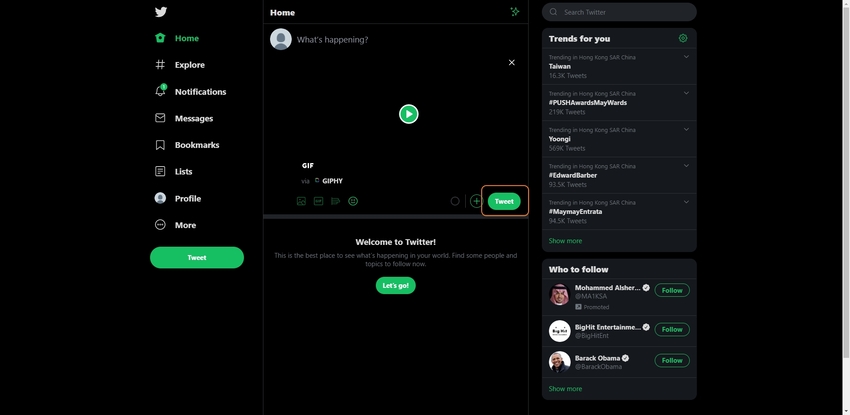
Step 3. Now, click on the Tweet.
Keep in mind about the size restriction of 15MB on Twitter and make a GIF within that file size.
Method 3: Tweet a GIF Using a GIPHY Link
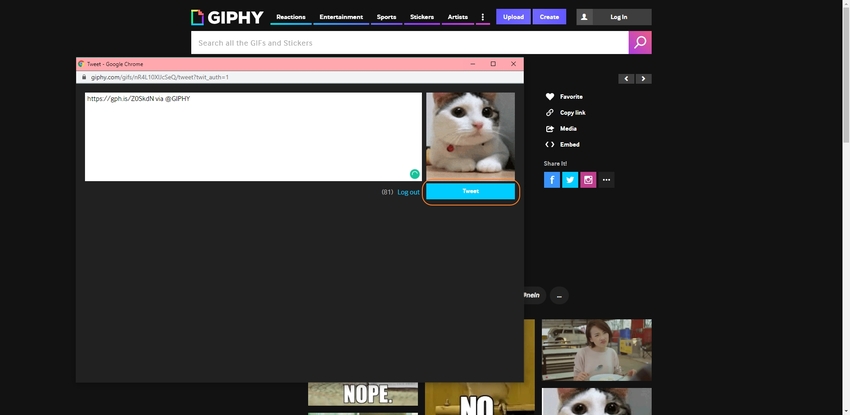
You can also use a GIPHY link to upload or add GIF to Twitter. Before we move on to the step-by-step guidelines, there is one thing that you need to consider. Make sure you are in your Twitter account, that too from the device you are using to share the GIF. Otherwise, you will need to authorize your user account through a pop-up.
Step 1. Visit GIPHY Website
On your web browser visit the GIPHY Home Page and select a GIF that you want to share.
Step 2. Share Your GIF
Before we move on to the step-by-step guidelines, there is one thing that you need to consider. Make sure you are in your Twitter account, that too from the device you are using to share the GIF. Otherwise, you will need to authorize your user account through a pop-up.
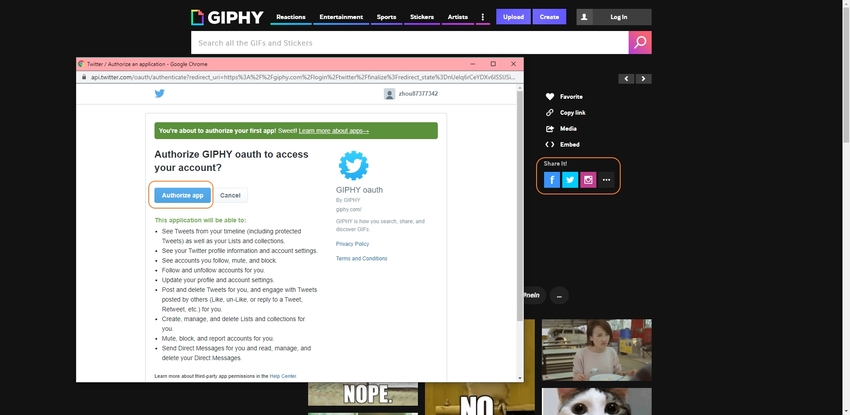
Alternatively, you can directly share the GIF by clicking on the Twitter icon. Now, the GIF will appear on your account.
Summary
By now, I am sure you have a complete idea as to how to make a GIF on Twitter using GIF Maker tools like the Wondershare UniConverter for both Windows and Mac. You also learned GIF-making with some of the online tools and how you can use various methods to upload a GIF on Twitter. So, go on and make your very first GIF and tweet it to share the fun with your friends.

