Adding animated GIFs while chatting with your loved ones exaggerates the message you wish to convey. That is the reason why almost every chat messenger tool, including Snapchat, now supports GIF files that you can send or receive during the conversations.
In case you are not aware of the process, here you will learn the two most straightforward ways about how to put GIFs on Snapchat while interacting with your family, friends, or colleagues on the messenger. It's pretty easy to send GIFs on snapchat.
Part 1. How to Make a GIF on Snapchat Using GIPHY
GIPHY is one of the most popular and widely used repositories that has animated GIFs for almost all genres, occasions, emotions, and expressions. These GIFs can be shared on your favorite social networking websites such as Snapchat, Facebook, etc. without downloading the files on your smartphone, tablet, or computer.
Talking about Snapchat, you can follow the steps given below to learn how to send GIFs on Snapchat while chatting with someone using the app:
Step 1. Tap the Camera Icon and Click a Photo
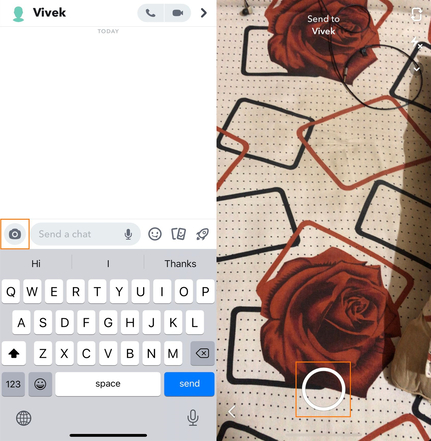
Launch Snapchat on your Android or iOS device (iPhone is used here as an example), tap the Chat icon from the bottom, and tap the name of the person you want to share a GIF with. Tap the Camera icon from the bottom-left corner of the chat box, focus on the camera on the object of interest, and tap the big circle from the bottom to snap a picture.
Step 2. Tap the Sticker Icon and Add a GIF from GIPHY
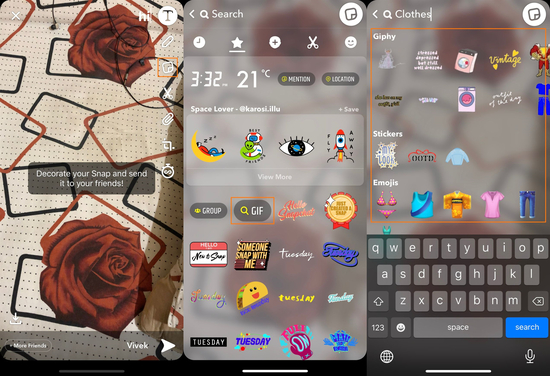
Tap the Sticker icon from the right, tap GIF on the next window, type a keyword at the top of the GIPHY window to search a GIF on GIPHY and tap the one you like most to add it to the snap you captured.
Step 3. Reposition the GIF and Send
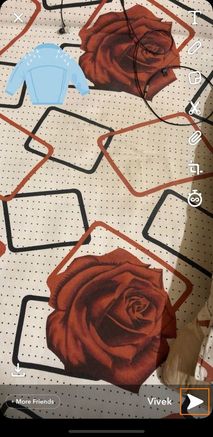
Back on the Camera window, drag the GIF to place it at your preferred position over the captured photo, and tap the Send icon from the bottom-right corner to send GIFs on Snapchat.
Part 2. Get GIFs on Snapchat via Sticker Feature
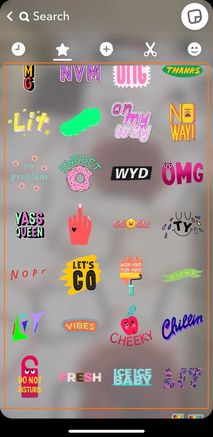
Apart from using GIPHY as its default source, Snapchat also has its own GIF library that can be accessed from within the Stickers window itself. On the Stickers window, the app lets you scroll and locate the GIF you want to share with your friends. You can even use the Bitmoji and Scissors features to create your avatars and stickers, respectively, to make your chatting experience more fun and enjoyable.
The process on how to put GIFs on Snapchat via the Sticker feature is almost identical to the one explained in the previous section, and you can get the job done in a couple of easy steps described below:
Step 1. Go to the Camera and Snap a Picture
Follow the procedure explained in the first step of Part 1 to open your friend’s chat window and capture a photo using the Snapchat camera.
Step 2. Tap Sticker and Select a GIF
Tap Stickers from the icons’ list that appears on the right of the screen. On the Stickers window, scroll down and locate and tap a GIF to place it over the photo you clicked earlier.
Step 3. Reposition the GIF and Share
Once you are back on the previous window, drag the GIF you added in the last step and place it on your preferred location on the screen. Tap the Send icon from the bottom-right corner to share the GIF along with the snapped photo with your friend you are conversing with.

Part 3. 5 Pro Tricks to Make Your Snapchat Better
In addition to the tips you learned in previous sections about how to send a meme on Snapchat and how to make a GIF on Snapchat, there are a couple of tricks that may not seem essential but may bring remarkable differences to smoothing your Snapchat experience.
5 Extra Hidden Tricks on Snapchat Are:
1. Add Extra Text to You Snaps
A single word or a short phrase added to a photo is called a caption. Including a caption to your snaps makes them more informative, so create a funny meme via online meme generator to change the picture's meaning. However, the key point is that the caption should be of appropriate length as adding a long text may make the image lose its essence, whereas if the caption is too short, it may not be able to convey the idea properly.

2. Secure Your Account in 2 Steps
As a Snapchat user, you are highly encouraged to enable two-factor verification for your account so that you always get an OTP while signing in from a new device. This arrangement not only keeps your credentials (username and password) secure, it also ensures that you are always using a trusted smartphone or tablet to sign in to your Snapchat account.
3. Change the Name that Your Friends Will See in Chat
It is recommended that you should change your display name after creating your account and signing in to it for the first time. Doing so helps your friends who are already using Snapchat recognize you easily, and don’t treat you like a stranger and bombard your chat window with questions like, Who are you?, Do I know you?, etc.
4. Use Emojis to Add Extra Colors to Your Photos
After you snap a picture on Snapchat, tapping the Stickers icon also gives you access to the Emoji library that allows you to add emojis to your photos. Adding emojis enables you to exaggerate your messages and convey your ideas more clearly, which is not possible while you are chatting with friends in plain text.
5. Apply Snapchat Face Lenses After Clicking a Photo
While using Snapchat, at times, you may want to apply face lenses to make your conversation more engaging and entertaining because of the funny faces that the feature produces out of your snaps. Depending on the topic of your discussion, applying a suitable face lens might take your convoy to an entirely different level.
Summary
The bottom line is, whether it is your chat or sharing the images, the process of how to put GIFs on Snapchat might come in handy. It could help you to convey your ideas to your family, friends, and colleagues more effectively while conversing with them not only on Snapchat but on any messaging app that you prefer to use.
Here has an excellent GIF Maker needs to introduce to you guys. This is Wondershare UniConverter. It supports users to upload a video or photos to create GIF for Snapchat. In 3 simple steps, you can quickly get your own GIF and share it on social platforms.
- Wondershare UniConverter supports Windows and Mac systems.
- Easily convert video, audio, and image files without losing quality.
- UniConverter supports users to transfer videos from computer to iPhone or Android mobiles without using iTunes.
- The Toolbox function allows you to convert images, create GIF, burn CD, rip CD, and fix Meta tags, etc.
- It allows you to burn video and other media files to DVD as well.

