Before you go ahead and slow down GIF, it is crucial to understand why do you need to control its speed in the first place. Managing GIF speed becomes crucial when the main message the animated file is designed to convey isn’t clear enough to the target audience. For instance, if you want to show the URL of a website frame-by-frame, the viewers may skip an essential element if the speed of the animation in the GIF file is too high. Likewise, if the speed is slow, the viewers may lose interest in the message, and leave the page or close the file altogether.
To overcome this situation, it is imperative to learn how to slow down a GIF or speed it up as needed. Although there are several methods to get the job done, some of the easiest ones are explained below in detail:
Part 1. Increase or Decrease Speed of GIF Online with Simple Steps
Many free online solutions help you slow down GIF. The good thing is, these tools also let you increase the speed of GIF if need be. Three most popular web portals to control GIF speed are:
EZGIF
What We Like:
- EZGIF is a complete workshop that can create GIFs out of video or images, optimize them for better usability, add effects to them, and much more.
- The solution is free to use, i.e., you can slow down GIF or speed it up without paying any price or purchasing a subscription plan.
- The expected output can be previewed before you can save the file to your computer.
What We Don’t Like:
- The web page has several distracting ads.
How to Speed Up or Slow Down an Animated GIF with EZGIF?
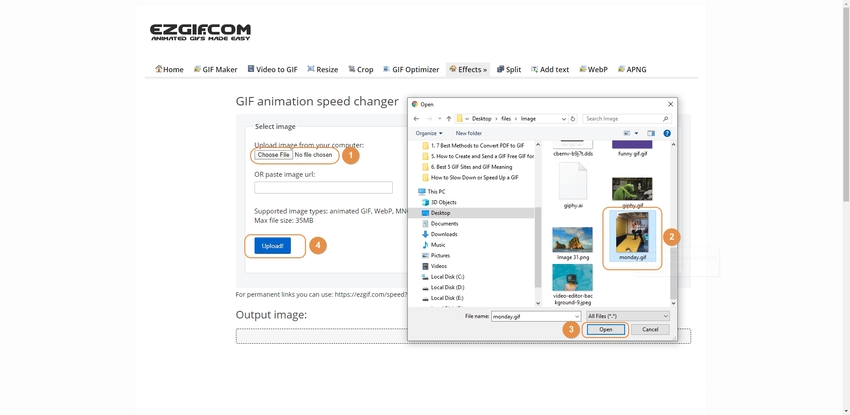
Step 1. Click Browse and Upload an Animated GIF
Launch your favorite web browser, go to the URL mentioned above, click Browse from the Select image section on the GIF animation speed changer page, use the File Upload box to navigate, locate, and select the animated GIF file you want to control the speed of, and then click Open from the bottom-right. Click Upload to upload the GIF to EZGIF.
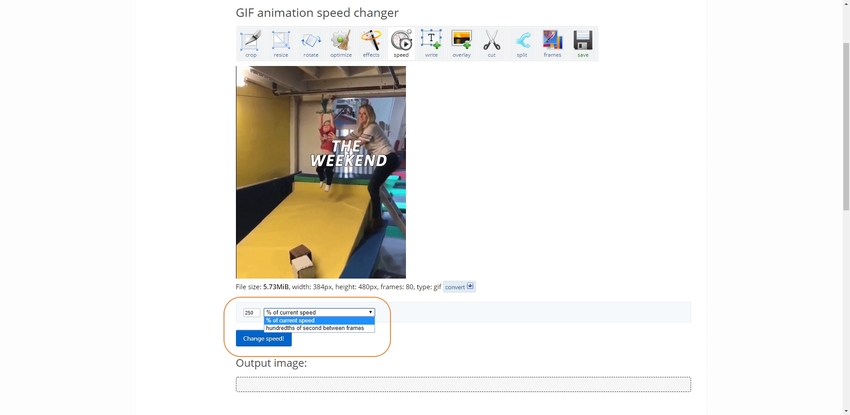
Step 2. Type a Value in % and Preview the Results
Type a new value (in percentage) for the animation speed in the box present below the preview window (250 for this example) and click Change speed!. Note: To slow down GIF, reduce the value in the box.
Step 3. Preview the Result and Save the GIF
Preview the expected result in the Output image section, and if everything seems correct, click save to save the modified GIF on your computer.
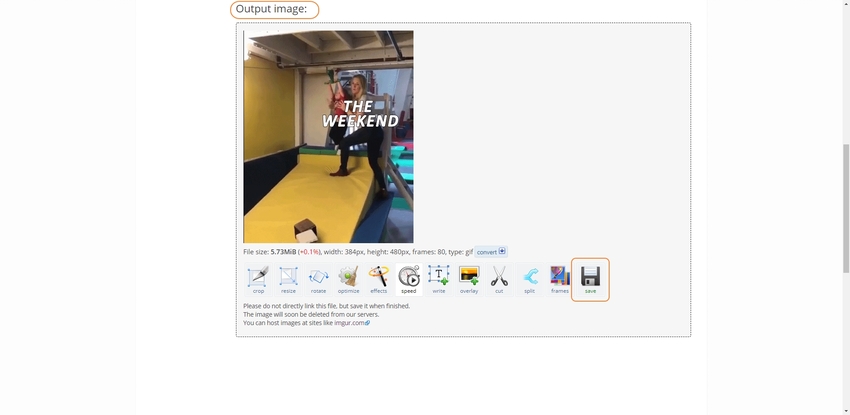
IMAGE ONLINE
https://gifspeed.imageonline.co/
What We Like:
- IMAGE ONLINE can do much more to a GIF file (e.g., resize GIF, convert animated GIF to JPG or PNG, etc.) than merely allowing you to increase the speed of GIF or slow it down.
- The portal is not limited to GIFs only, but also has various tools like image filter, image converter, graph creator, image encryptor, etc.
- It doesn’t have a lot of distracting advertisements.
What We Don’t Like:
- Sometimes the preview of the file before downloading isn’t clear enough to guess the output, and the modified results might not come up as expected either.
How to Speed Up or Slow Down an Animated GIF with IMAGE ONLINE?
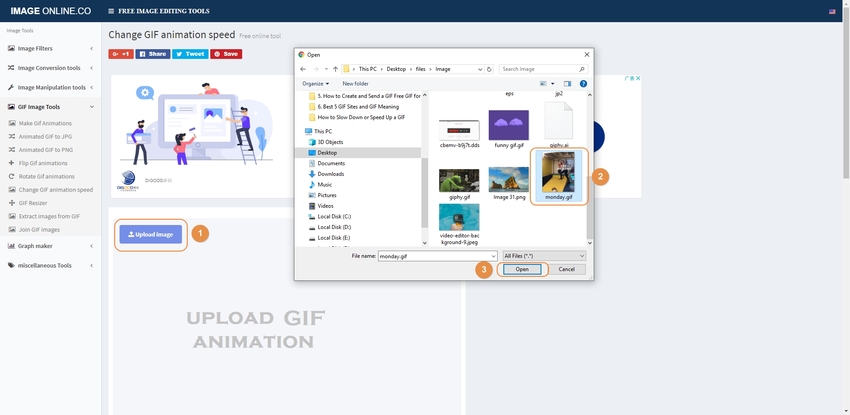
Step 1. Click Upload image and Upload a GIF
Use the link given above to go to the Change GIF animation speed page, click Upload image, select the target GIF file, and click Open.
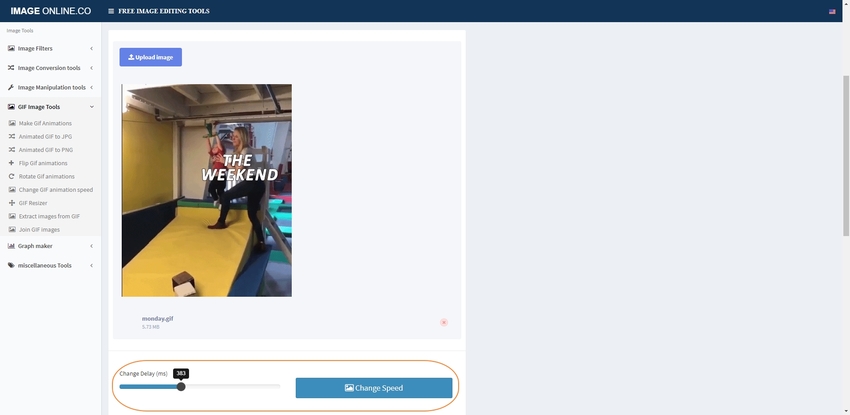
Step 2. Adjust the Slider for Speed and Click Change Speed
Move the Change Delay slider to the right or left to increase or decrease the delay time of the animation, respectively. Click Change Speed when done to slow down GIF or to increase the speed of GIF as configured.
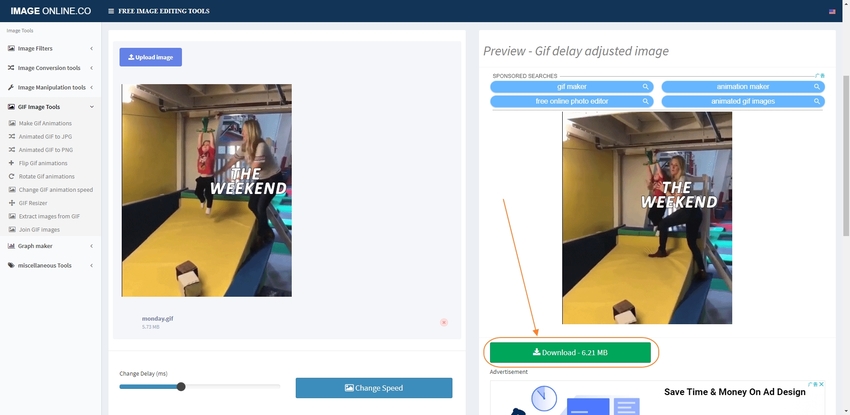
Step 3. Preview the Results and Download the File
Check the expected output result in the Preview – GIF delay adjusted image section in the right, and click Download if you find the modified GIF acceptable.
KAPWING
https://www.kapwing.com/tools/change-video-speed
What We Like:
- KAPWING is a one-stop-shop for all your video editing and manipulation needs.
- The website has a couple of pre-built templates to help you start your work.
What We Don’t Like:
- It does not support GIF files, and the videos need to be converted to GIF post-completion as well.
- Requires you to create an account and sign in to export your creations without watermarks.
How to Speed Up or Slow Down an Animated GIF with KAPWING?
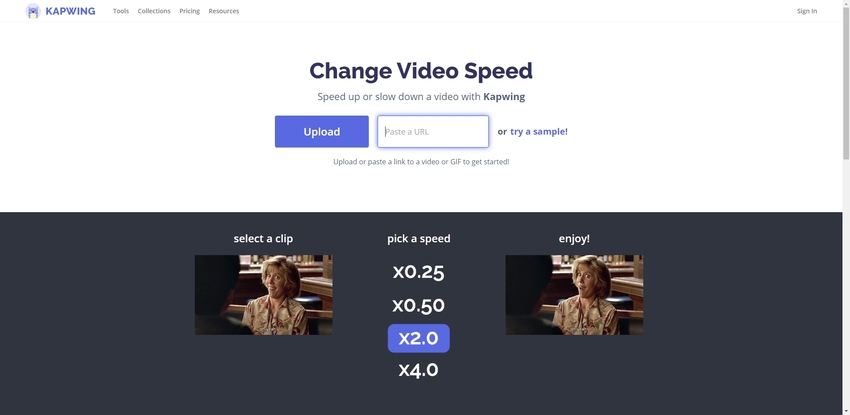
Step 1. Copy the URL and Paste It on KAPWING
Open your favorite web browser, search online and locate a GIF file, and copy its HTML5 video URL. Next, open a new tab in your browser, follow the link given above to go to the Change Video Speed page, paste the URL you copied earlier in the Paste a URL field, and wait while KAPWING fetches the content from the source site.
Note: Make sure to copy the HTML5 video URL of the file as KAPWING doesn’t support GIF URLs).
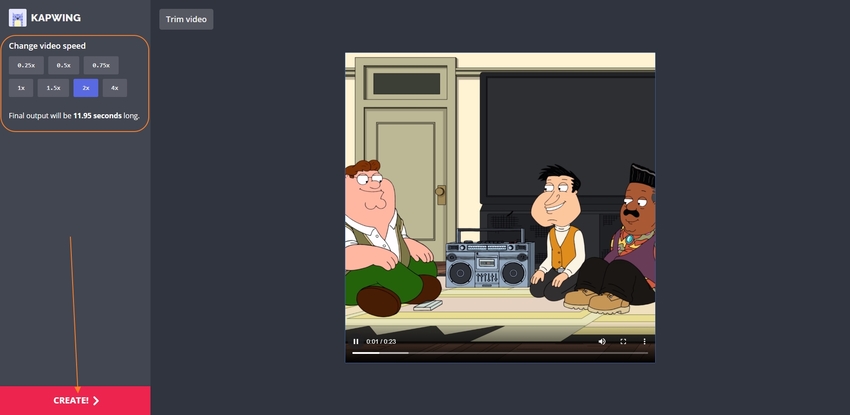
Step 2. Select a Speed and Click CREATE
Select your preferred speed from the Change video speed section in the left pane (2x here to increase the speed of GIF), and click CREATE from the bottom of the left pane.
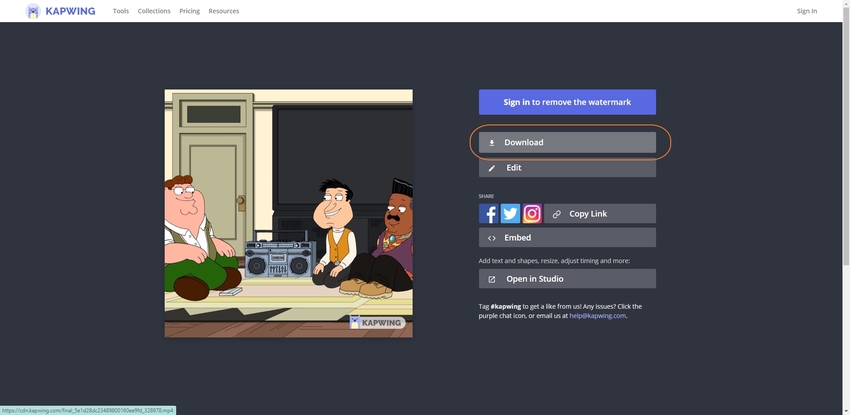
Step 3. Click Download and Download the File
On the next page, click Download to download the file as an MP4 video on your PC. You can then use any of the free converters to convert the file to GIF.
Part 2. Other Way to Speed Up or Slow Down the Animated GIFs
GIF files are tightly packed and cannot be dissected easily. Therefore, unlike many online tools, to slow down GIFs, most offline programs require you to define the speed of the videos or images before converting them to animated GIFs. Although Wondershare UniConverter follows the same process, the level of efficiency that it provides with the simple UI is the reason behind the software’s remarkable success in the industry.
- · Wondershare UniConverter can recognize and convert videos to and from almost all major formats.
- · The program makes it extremely easy to create VR (virtual reality) environment for some of the most popular VR headsets out of files on your computer.
- · The software has several built-in tools for video treatment such as compressor, editor, ability to add filters and watermarks, ability to add subtitles, etc.
- · The application can also record videos from your computer screen or webcam.
You can learn how to slow down a GIF or how to speed up a GIF in Wondershare UniConverter by following the steps given below:
Step 1. Click Add Files and Import the Source GIF
Download, install, and launch Wondershare UniConverter on your Mac or Windows computer, ensure that the Convert tile is selected from the top, click Add Files from the center of the window. Click All Files from the drop-down list at the bottom of the Open box, select the GIF file you want to increase or decrease the speed of, and click Open.
Step 2. Choose MP4 as Output Format and Convert GIF to Video
Open the Convert all files to the menu from the top-right corner, select MP4 from the left pane, and select your preferred resolution from the right (Same as a source here). Back on the main interface, choose the destination folder from the Output field at the bottom, and click Convert to convert GIF to MP4.
Step 3. Go to GIF Maker and Import Video
On the UniConverter’s main window, click the Toolbox tile from the top, and click GIF Maker. Make sure that the Video to GIF tab is selected, click Add Files from the top-left corner, select the MP4 file you created out of GIF in the previous step, and click Open.
Step 4. Change the Framerate and Convert
Check the current framerate in the Frame Rate box in the left section. Reduce the value to slow down GIF (20 is used here) that you are about to produce, or use a higher number to increase speed of GIF as needed, define an output folder for the GIF file in the Save to field, and click Create GIF from the bottom to create a new GIF with the modified speed.
Part 3. How to Control GIF Speed with Wondershare Filmora?
Wondershare Filmora is an advanced video editing program used by professionals to produce industry-standard footages for almost all platforms. The software has several built-in presets to add transitions, titles, effects, and filters to the raw clips. The edited and fine-tuned videos can be exported in various formats such as MP4, WebM , AVI, MOV, MKV, etc.
To learn how to slow down a GIF or speed it up using Wondershare Filmora, you can follow the steps given below:
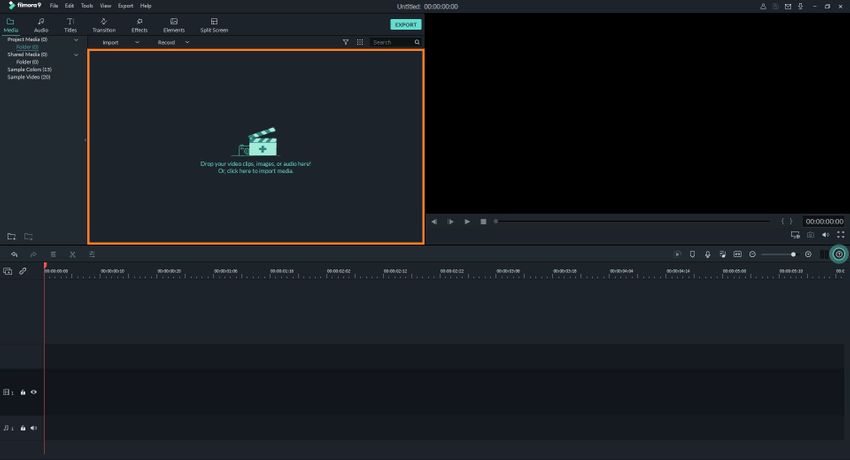
Step 1. Click Media Bin and Import a GIF
Launch Wondershare Filmora on your computer (Windows or Mac), click Media Bin from the upper-left section of the interface, and use the Open box to import the GIF file, as explained earlier.
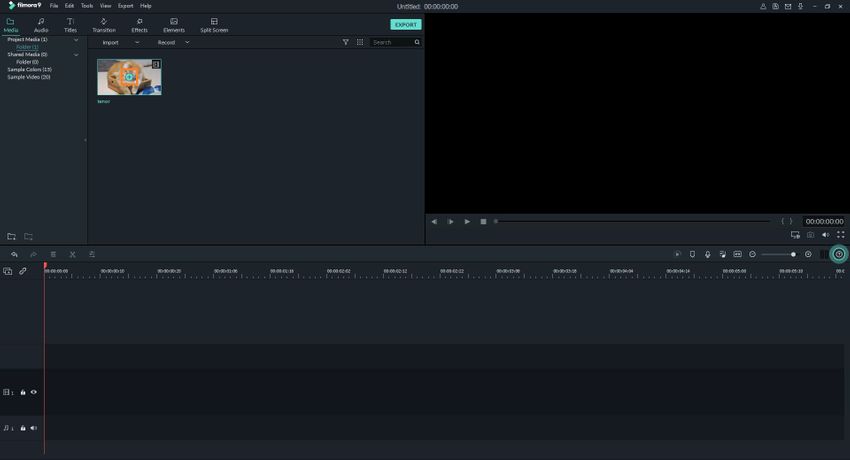
Step 2. Add GIF to Timeline
Hover mouse to the GIF in the Media Bin, click the + icon that appears and click MATCH TO MEDIA to add the file to the Timeline at the bottom.
Step 3. Slow Down GIF or Increase Its Speed
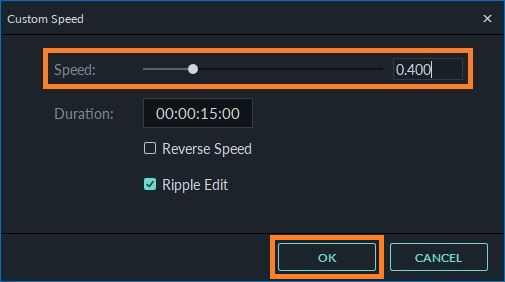
Right-click the file in the Timeline, go to Speed and Duration, move the Speed slider to the left to slow down GIF, or move it to the right to increase the speed of GIF as needed.
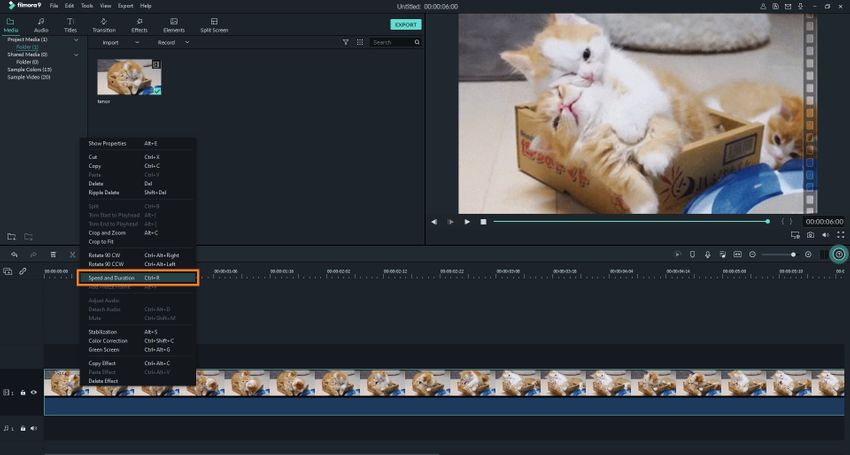
Click OK to accept the changes and get back to the main window.
Step 4. Click Export and Save the GIF
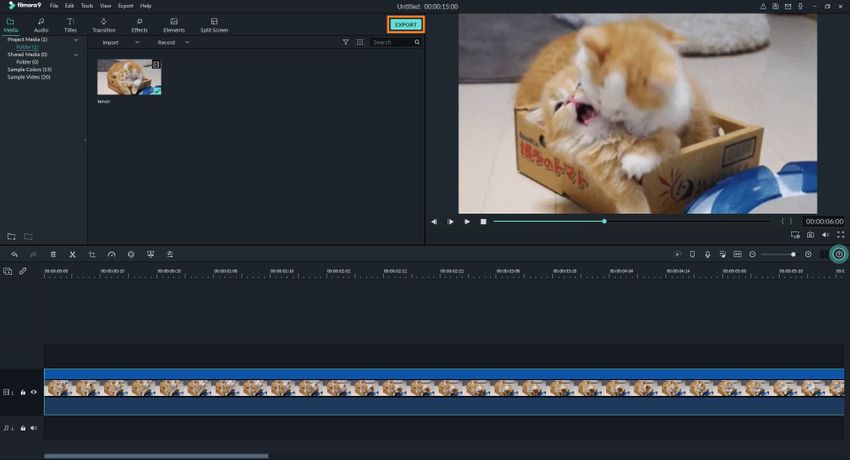
Click EXPORT from the top-center of the interface, ensure that the Local tab is selected from the top of the Export box.
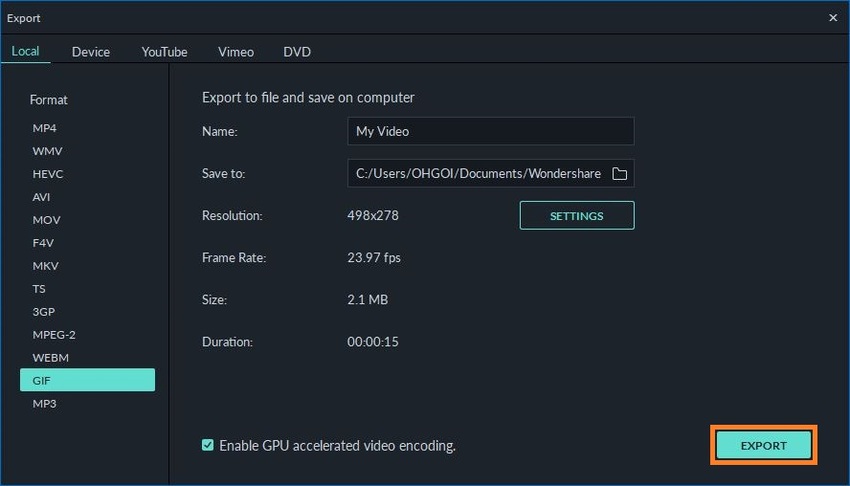
Choose GIF from the list in the left, and make necessary changes in the right pane. Click EXPORT from the bottom-right corner of the box to save the file on your local computer.
Summary
The process to slow down GIF or increase speed of GIF is simple with online tools. However, if you want more control over the files and require unrestricted access to all the features essential for managing the animation speed, a desktop program such as Wondershare UniConverter or Wondershare Filmora would be good to try.

