Resizing of images makes them apt to be used online on various sites and blogs and also for sharing easily over the mails. GIMP is one of the popular programs that help in image resizing. Standing for GNU Image Manipulation Program, GIMP is a cross-platform free and open-source tool that supports image editing, retouching, drawing, and other functions. The following part of the topic will help you to know more about how to use GIMP resize images.
Part 1. Steps to Resize Images Using GIMP
Using the GIMP tool, several changes can be made to your images using the editor including file resizing. You can choose to enlarge, reduce, change layers, and perform a host of other functions. Multiple files at a time can be processed using the batch processing feature of the software The program is available for Windows, Mac, Linux system to resize image GIMP and other functions.
Steps on how to resize an image in GIMP
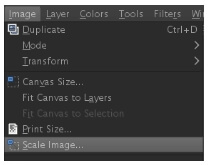
Step 1: Open the program and go to File > Open to add the image to be resized. Next from the top menu bar select Image > Scale Image option

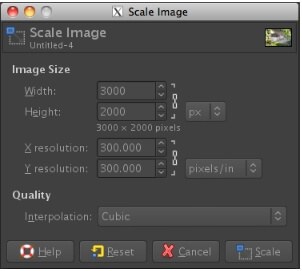
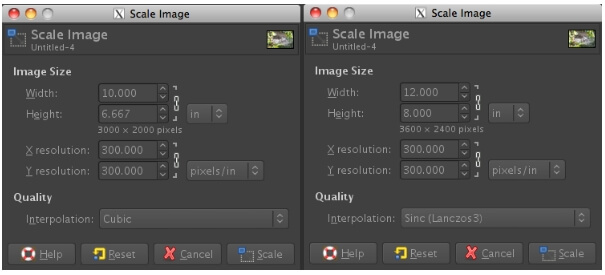
Step 2: A pop-up Scale Image dialog-box will now appear from where you can select the required image size by mentioning the height and the width. The size can be selected in pixels, percent, inches and other units which you can check from the drop-down menu next to the values. Also, choose the resolution of the file

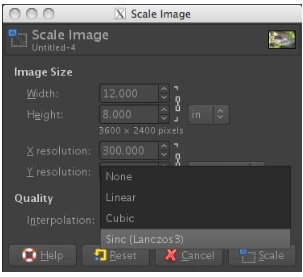
Step 3: Next, expand the options at the Quality tab and select from the available options..

Step 4: Finally, hitting on the Scale button will start the GIMP resize process. The file will be resized to your selected size.

Part 2. Free Online Tool to Resize Images without Losing Quality
For resizing your images without installing any third-party software, Wondershare Online UniConverter is a good tool. The program can work for free from your Windows and Mac systems and supports JPG, PNG, BMP, and GIF formats. At a time, 5 files, each of size up to 5MB can be added and processed using the program. The files can be processed based on the size or the percentage. The resized images can be saved to your system or Dropbox as needed. A simple interface and quick process make the program popular among the users.
Steps to resize images using Online UniConverter
Step 1: Launch Image Resize page and click on the + sign to add the images.
Step 2: Choose the target file size as needed. You can choose by size or by the percentage of the actual image.
Step 3: Hit on the Start button to proceed with the file resizing process.
GIMP resize image without losing quality, but you need to download and install the program. If you have multiple images to be processed along with the requirement of additional editing features, GIMP works as a good choice. For simple and quick resizing Online UniConverter can be used as it works straight from your browser window.

